
Utilizing CoConstruct's single-entry financial system allows you to enter the project scope - including specs, allowances and options - and leverage that information to obtain and lock inaccurate pricing for you and your clients.
Here's how to leverage the features of CoConstruct effectively to achieve this goal:
- Set up Accounting Codes
- Build your estimate framework
- Request Bids from Trade Partners
- Manage Bid Requests
- Populate your estimate with winning bids
- Present the proposal to your clients
Accounting Codes
In CoConstruct, your accounting codes will be the basis for budget tracking throughout the project. If you already have a set of accounting codes that you use for job costing, getting those set up from the beginning allow you to more accurately track your budget costs throughout the job by creating consistency within financial transactions.
Accounting codes carry expected costs from your estimate and selections through your purchase orders, time tracking and project expenses to allow you to easily see where your project financials vary. This will allow you team to make better real time decisions on purchasing to keep the project on track and perform an effective post-mortem to improve your financial position on future projects.
If you don't have accounting codes, get started with the NAHB codes for direct construction costs.
- Navigate to Settings > Accounting Codes.
- Select the Accounting Codes tab.
- Add Accounting Codes:
Import from QuickBooks:
- When you import from QuickBooks, an accounting code in CoConstruct will be created for each item (QBD) or product service (QBO). If you already have accounting codes in CoConstruct, be sure that they match exactly your QB items to prevent creating duplicates. If they don't, then manually match the codes instead of importing.
- Select Import > from QuickBooks.
- Import.
Import from a Spreadsheet:
- Select Import > from Spreadsheet.
- Download the import template.
- Enter your codes and descriptions into the spreadsheet.
- Save the spreadsheet to your desktop.
- Select the file > Import.
Manually add Accounting Codes:
- Select + New.
- Manually enter the accounting code and description.
- Select OK to save.
For more information on setting up your Accounting Codes in CoConstruct, check out our Help Center here.
Build Your Estimate Framework
The first step in building out your estimate is to input the items and outlining the relevant costs that make up the project scope. This will be the basis for the information you're requesting in your bids and eventually building out a proposed price for your clients.
Keep in mind, that you don't need numbers yet - you'll get these through your bids - but any related quantity data or specifics of what should be included (or not included) in the base proposal price should be set up here.
Once you have the outline of items and costs that you need to account for, you'll be ready to build out the detailed scope of information you need to supply to your clients and trades.
- Navigate to the project > Estimate.
- Select Markup, Margin & Tax at the top of the estimate to set your markup percentages and add additional markups or taxes to the estimate.
- To leverage formulas in your estimate, select Parameters to enter parameters for your project. You'll be able to use these in formulas to calculate quantities: Calculating Quantities with Formulas & Equations
- Select + New to add items to your estimate.
Import from a Spec/Selection Template:
- Select Copy from Spec/Selection Template.
- Choose the correct template from the drop down.
- Choose the items you wish to bring into the project. You can select the entire template or individual categories and items.
- Click Copy items to the Estimate.
- Repeat the steps above to combine items from multiple templates.
- Click the drop down beside Description to expand out the items and update cost lines and costs.
- Click into the individual fields to update descriptions, units, unit costs and accounting codes.
- Save Changes.
Add Spec/Selection Items Manually:
- Select Specification or Selection:
Specification: Items included in the scope of the project based on the plans. Specifications will provide a scope of work and pricing, but no choices need to be made by the clients.
Selections: Items where an allowance or standard option will be included in the base price and the client will need to make a choice to determine the final work.
- Enter an item name to describe the grouping of costs. Use number or lettering sequences to control the order in which items show up on the estimate. Without a preface number or letter, items will be ordered alphabetically.
- Select a Category for the item. Select Edit Categories to add or adjust existing categories for the project.
Enter details for the item scope:
Specifications: Enter the scope of work for the item to lay out for clients, trade partners and team members what is being included in the price of the item (or specify what's not included).
Client Notes: Enter details for the client specifically regarding the item. Typically, for Selections, this is a good place to include preferred vendor information, measurements or lists of details needed for the client to make their choice.
Trade Partner Notes: Enter details for trade partners including necessary information for trades to complete work, delivery information or other notes to ensure compliance.
- Enter Original Budget costs: Specify costs for labor, materials, subcontract work and equipment related to each item. These costs will make up your base price for the project's contract. You can pull costs from the Cost Catalog by beginning to type a description and selecting the correct item.
- Use Formulas to calculate quantities based on set Parameters.
- Leave unit costs blank for costs that you need to get bids from your trade partners.
- Save Changes on the estimate.
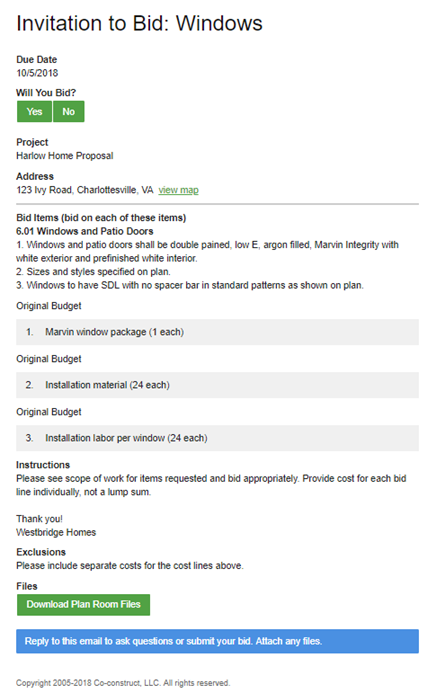
Request Bids from Trade Partners
- Navigate to the Bids tab
- Upload files to the Plan Room. This should include any plans, drawings or schematics needed for subcontractors to provide accurate quotes.
- Select + New to create a new bid request:
- Enter a title for the bid - this will help you identify the bid request from the main page. You should issue bids based off trades and like items.
- Select Add Bid Line > Use Existing Cost Lines. This will allow you to pull line items directly from your estimate to automatically populate the specification information and allow you to push winning bids back to your estimate.
- Select Trade Partners from your list (Contacts > Trade Partners) to bid on the selected items.
- Add any additional instructions, inclusions and exclusions to provide information your trade partners will need to submit and accurate bid.
- Set a due date for the bid and reminders for the system to alert trade partners who have not submitted their bids yet.
- Send bid.
- Your Trade Partners will receive an email with all details, a link to the plan room and button to indicate whether or not they'll bid on this project. To submit their bids, the trade just needs to reply to the email to include numbers in an attachment or the body of the email.
Manage Bid Requests
- As trade partners submit their bids, you will receive a notification based on your Personal Settings. You'll also see the Updated badge on the individual bids.
- Navigate to the Bids page of the project.
- Select the corresponding bid request.
- Under the Comments section of the request, you can review responses from any trade partners to the bid request email.
- After reviewing submitted numbers, click into the bid table at the top of the corresponding trade partner and enter the numbers there.
- The table will allow you to compare bids for the section of the project and determine the winning quote.
- Once all bids have been reviewed, select the winning trade partner from the top bid table and select Award. You can choose to send a notice to the winning trade partner that they have been awarded the project.
- Select Push to Estimate to populate the estimate with the winning bid numbers. The numbers from the bid will replace any unit costs within the current estimate.
- Repeat this process with each bid you receive until all are finalized.
Present the Proposal
- To enable client details, signature lines and notifications on the proposal, be sure to add your client to the project. To do this, go to the Project Setup page > Add Clients.
- Once all bids are finalized and the estimate is fully updated, navigate to the Proposals.
- Select + New to create a new proposal document
- If your account already has a proposal template in place, select that template. Otherwise, select Blank to built out your proposal (you can create a template from this later).
- Add a title for the Proposal - this might include a date if revisions are likely. If your team does separate proposals and contracts before the project is confirmed, label it appropriately.
- Include an Introduction. This is where you can enter your company's logo, address and client information. You may also want to include an introduction to your client including awards or accolades or background information on your company. Use the Info icon to insert details from the project as placeholders. This is especially helpful when creating a template so details will be filled based on the information on individual jobs.
Include Financials:
- Select the level of detail of pricing you want to show your client. You can include high level category pricing, individual item pricing and even cost line details.
- Show Client Information if there are details there you wish to include in your proposal or contract.
- If you have a gross sales tax on the job, you can elect to show a project sub-total and tax total on your proposal.
Include Closing information. This will include your contract language, payment terms and any other legalese that should be covered as part of your contract.
- Select signature lines for team members and clients and elect whether you'd like to use the e-signature option.
- Set team members and clients you'd like to receive notifications about the proposal. The individuals selected will receive a notification when the proposal is issued and approved by each selected party.
- Send the Proposal.
- Create a template from the project proposal by clicking the three dots to the right of the proposal > Create template. This will save the Intro and Closing details from the proposal into a template to easily populate Proposals for future projects.
Populate Your Cost Catalog
The Cost Catalog is a great tool to save standard costs to quickly build and update your estimates.
- Navigate to Templates > Cost Catalog.
- Add Costs:
Import from a Spec/Selection template or Project:
- Select Import at the top left of the screen.
- Select either From Project or From Spec/Selection Template.
- Choose the name of the project or template you wish to import from.
- Choose the line items from the project or template you wish to add to the Cost Catalog. Costs that should be saved are:
- Standard costs for various labor
- Equipment rental costs
- Material costs from vendors and suppliers
- Add to Cost Catalog.
- Repeat the above steps to bring costs from additional projects or templates.
Import from a Spreadsheet:
- Select Import at the top left of the screen.
- Select From Spreadsheet.
- Download the Cost Catalog import spreadsheet.
- Enter the details for the costs you want saved in your Cost Catalog.
- Save the file to your desktop.
- Select the saved file.
- Import.
Manually Enter Costs:
- Select + New at the top left of the page.
- Manually enter the details of the cost.
- Save.
You can easily update costs in your Cost Catalog as prices and labor costs change.
- Navigate to the Templates > Cost Catalog.
- Use the checkbox to the left of each item to multi-select costs that need to be updated.
- Select Edit.
- Make necessary changes to description, cost, accounting code, etc.
- Save changes.
- In the yellow banner, select whether to update existing projects and/or templates with updated costs.
