
There are two different ways that you can apply markup on your estimate, depending on the financial structure of your project, as well as your preferences.
Markup applied per line item, in columns
This configuration is the only option on Fixed Price projects. Since your line items will drive any prices that your clients see, this will ensure that they are always seeing pricing information that includes your company's markup.
On Open Book projects, you can use this option for added flexibility when marking up your data.
Configuring your markup as columns will help you easily see your markup amounts for each individual line on your estimate. Those markups will appear as columns on the right side of your estimate.
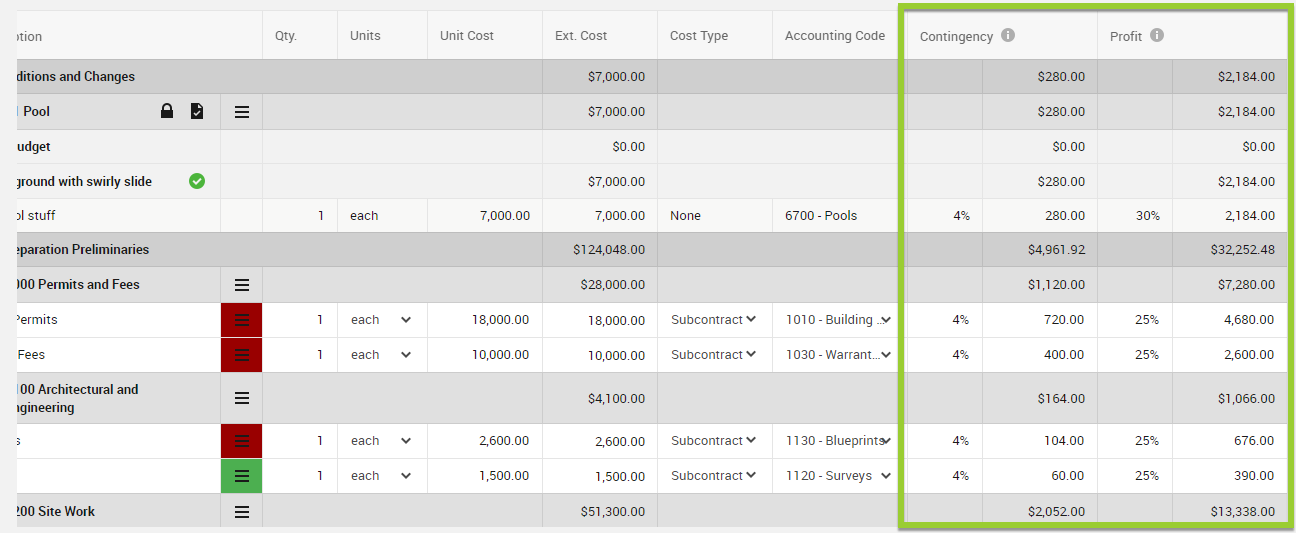
Since the markup is applied on a line-by-line basis, you are also able to update markups individually for each line. This will let you, for example, apply a 10% markup to some items, while applying a 5% markup to others.
You can even take this a step further to apply different markup to different "cost types." As an example, this will let you apply taxes to material costs while omitting the tax from labor costs.
You can change your default markup percentages at any time with the "Edit markup configuration" button. When you do this, you can choose to overwrite all of your existing markups with the new percentages, or to use the updated markup as the default for new line items, without adjusting your current percentages. More information about overwriting markups.
On the "Edit markup configuration" page, you will set the accounting code to use for each markup. You can use a dedicated markup/fees/overhead accounting code, OR, use the same accounting code that you are using for the extended cost.
Markup applied globally, as rows
While configuring your markup in columns gives you a lot of flexibility for updating percentages or amounts on a line-by-line basis, that level of detail may not be necessary on Open Book projects.
Configuring your markup as rows will help keep your markup simple and straightforward. Rather than seeing marked up totals for each line item, you will have a separate section of rows at the bottom of your estimate that will apply the markup to your entire project's subtotal.
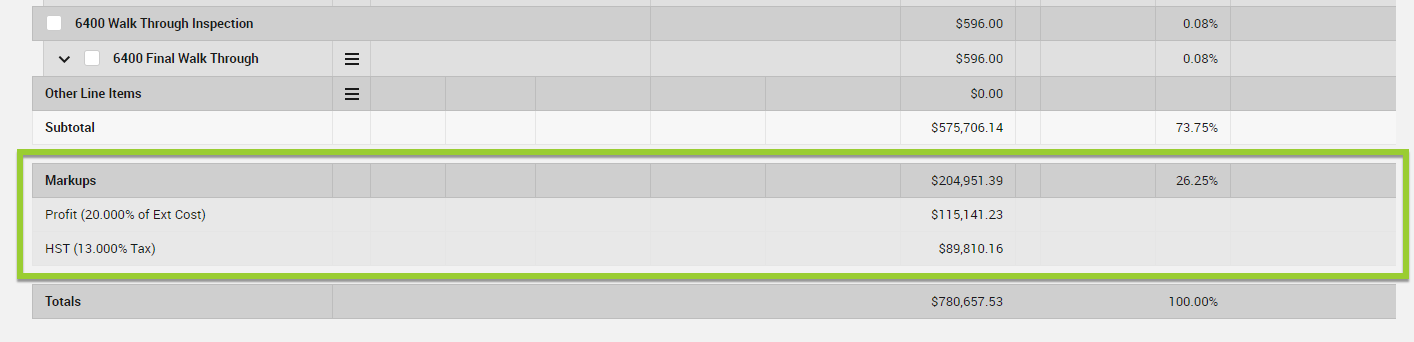
This is the option for you if you do not need to set different markup for labor vs. materials, or different markup on roofing vs. framing. If you just want to mark up the subtotal of your project, this gives you an easy way to do that, separating your markup from the individual line items on your estimate.
Since markup is applied to the subtotal of the project, rather than the individual line items, there is no way to overwrite markup amounts on a line by line basis. Your markups can still be revised though. For example, you can easily update your margin across the board from 10% to 15%.