
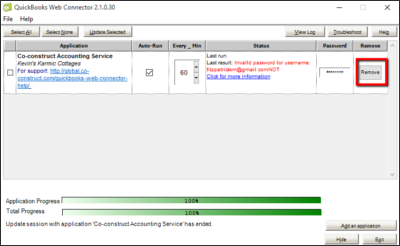
When you run your Web Connector, the status next to CoConstruct Accounting Service should read "Connection Closed". If you're seeing a red error message there, please contact our Support team at 800-213-3392 option 2 or support@co-construct.com with the reference number so we can look up the specifics of what is causing the sync to fail.
Below, we've outlined some common instances where you may need to update or reconfigure your Web Connector setup to continue syncing with CoConstruct that you can manage from your side.
- Updating Web Connector if your CoConstruct password changes
- Reconfiguring Web Connector for a new user, email address, or computer
- Reconfiguring Web Connector for a different QuickBooks company file
- What to do if you do not see an estimate or invoice in QuickBooks after pushing from CoConstruct
Updating your password in Web Connector
If you set up the QuickBooks integration and configured Web Connector, then the connection between Web Connector and CoConstruct is tied to your specific login password.
If your password changes in CoConstruct, you will be prompted to update the password that Web Connector uses. Here's how to do that.
- Open QuickBooks
- Navigate to File > Update Web Services to pull up Web Connector
- Enter your new password in the "Password" field
- Check the box on the left side of Web Connector and choose the option at the top to "Update Selected"
- If prompted, choose to save the new password in Web Connector
This will run a new sync of your QuickBooks information using the new password, and you will be all set for future syncing from your QuickBooks file.
Reconfiguring Web Connector
When Web Connector is configured, it is tied to the specific CoConstruct email address that was used to download the .QWC file and set up the connection.
There are a few scenarios where you may need to reconfigure your Web Connector settings:
- You changed the login email for or removed the user who set up Web Connector from CoConstruct and you need to update the Web Connector connection to match the new login
- You need to move your QuickBooks file to a different computer
- You need to resolve or troubleshoot other technical issues
To reconfigure Web Connector:
Remove the old Web Connector connection from QuickBooks
- Open Web Connector (from QuickBooks, navigate to File > Update Web Services
- Select the "Remove" button on the right side of Web Connector for your existing CoConstruct Web Connector entry and confirm the removal
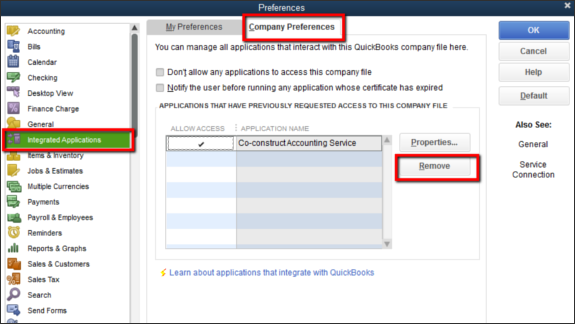
- In QuickBooks, navigate to Edit > Preferences
- Select "Integrated Applications" from the left portion of the preferences pop-up, and choose the tab for "Company Preferences"
- Select the "CoConstruct Accounting Service" entry and click "Remove"
Download and open a new .QWC file
- In CoConstruct, head to Settings > Accounting
- Click on the "Change user" or "Set up on new computer", depending on the circumstance
- When prompted, download the .QWC Configuration file and open it on the same computer where QuickBooks is installed
Configure Web Connector
You will configure the new Web Connector file just like you did the first time around:
- When the .QWC file opens, you will be prompted to open up the QuickBooks file that you want to sync
- Click "OK" to continue configuring Web Connector
- Next, you'll want to select the option under "Do you want to allow this application to read and modify this company file?" for "Yes, whenever this QuickBooks company file is open"
- You do not need to grant access to personal data such as Social Security Numbers
Confirm the Web Connector reconfiguration in CoConstruct
- When you've done all that, head back to the Accounting Integration settings page in CoConstruct and click the "Continue" button.
- Then click "Save" to finalize everything.
You're all set with the new configuration!
Reconfiguring Web Connector to a different QuickBooks file
If you are reconfiguring your Web Connector setup, we will attempt to keep all of your current linkages in place.
While this is almost always possible, you will receive an error message if you are trying to update your Web Connector setup and you link to a different QuickBooks file than the one your account was previously connected to.
In order to link up to a brand new QuickBooks file that you have not used previously, you will need to completely unlink your CoConstruct account by going to the Accounting Integration settings page, selecting "Disconnect", and confirming when prompted. After that, you will be able to reconnect to the new QuickBooks file.
*Be aware that completely unlinking your CoConstruct account as described above will also remove any project, accounting code, purchase order or invoice linkages that are in place on your account, and you will temporarily lose any information that was synced from QuickBooks (payments or budget actuals) until your account is reconnected. Once your account is reconnected, your budget actuals and client payments should reappear.
An invoice or estimate appeared to sync successfully, but I don't see it within QuickBooks
If you sync a fully-approved approval document or push an estimate from CoConstruct to QuickBooks, then you will want to make sure that Web Connector has successfully run before you will see the changes reflected within QuickBooks.
- Open your QuickBooks file and navigate to File > Update Web Services
- Check the box on the left side next to the "CoConstruct Accounting Service"
- Select the button at the top to "Update Selected"
- Wait until the sync completes and ensure there are no error messages
- Pull up your QuickBooks file again and check for the invoice or estimate
- If you still don't see it, let us know so that we can help figure out what might be going on