
The Warranty page of CoConstruct gives you a place to track and manage all of your warranty requests, warranty check-ins, or punch list items.
Adding warranty requests
No matter where you are, you or your clients can add warranty requests quickly:
- Warranty page - Just type it in on the Warranty page and hit enter.
- Mobile app - Whenever you're away from the computer, add your warranty work with the mobile app and they'll all be tracked and at your fingertips in CoConstruct.
When you enter your warranty requests, include as much or as little detail as you want:
- Name (required)
- Longer description - Enter in a list of steps, detailed directions, or guidance for the people doing the work.
- Builder assignee - You can set any one person from your team who will be responsible for ensuring the work is completed.
-
Partner assignee - You can set up to one sub/vendor who will be responsible for the work.
Following project management best practices, assignees are limited to ensure that there is clear responsibility and accountability for the items -- If you have many people assigned to an item, you really have nobody responsible for ensuring it's completion.
- Due date - Set a date when you need to have the work completed.
- Sublist - Use the sublist dropdown to categorize the warranty request, letting you distinguish between your punch list items, items from a 30-day walkthrough, etc. Your sublists are fully customizable.
- Photo or file attachments - Attach a file to ensure the scope of the work is clearly delineated. Your assignees can even upload their own files, great for sending you a visual confirmation or a completed form. Attachments can be added from the full site, mobile app, or via email replies to any to-do notifications. Click for more information on attaching photos and files to your warranty requests.
When your clients add requests of their own, they will only be able to enter a Name, Longer Description, and include any photo or file attachments. Assignees, due dates, and sublist information will only be visible on your side as the builder.
When your clients add a request, you will be able to "Accept" it to move it to your list of open Warranty work, or else mark it as "Not Warranty" to move it to the bottom of the page.
Warranty Notifications
For users who are assigned to warranty requests on your projects, there are two different types of notifications that will alert them to the assignment and convey the details for the work.
- Work request
- Sent within minutes of an assignment or updates to the details or due date for an item.
- Includes information specific to the single warranty request
- File/photo attachments are included directly in the email, and the assignee can access without ever having to log into CoConstruct.
- Task summary
- Sent on specific days (according to settings for the assignee)
- Includes information on all open, overdue, or upcoming work for the assignee
- File/photo attachments are not included directly in the email, but are included as links to the full site.
Learn more about warranty notifications.
Updated, upcoming, or overdue warranty requests
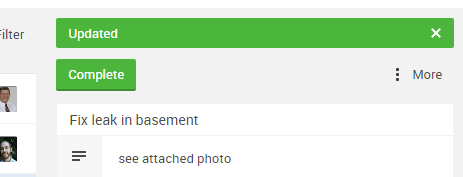
Whenever a warranty request is updated or posted by a team member other than the update clearer, you will see a green dot ![]() on the Warranty page to call out the update.
on the Warranty page to call out the update.
When new comments have been posted on the item, you'll see the green dot and the recent comments will be called out for your review. When you've reviewed everything and replied or taken appropriate action, clear the updates by clicking the "x" in the "Updated" banner at the top of the to-do.
Warranty requests are marked upcoming or overdue based on the due date that you set (if applicable), along with your personal settings and the project's warranty expiration period. Learn more about when warranty requests are listed as upcoming or overdue.
How will your clients or partners use the Warranty page?
Clients can request warranty work and will see any of the requests that they have entered, or requests that are marked "Visible to clients" (with a green two-person icon to indicate this visibility). You can change the client visibility for warranty requests that you've entered at any time.
For any items that your clients can see, your client can actually mark things complete and verify completions on their side of the site, and everything will be logged with the date/time and who made the changes.
Partners can get all of the information they need over email, without ever having to log into CoConstruct! If they are set up to receive individual work requests, that work request will include all of the details you entered, plus any files or photos you have included as attachments.
If you do grant login access to your partners, they will be able to view the same details as what you see.
Your clients and partners will still only see the comments or files that have been shared with them, or which they themselves have posted. This lets your team have private conversations or share sensitive files that you may not want to share to absolutely everybody.
Learn more about how your clients and partners can interact with your warranty requests.
Additional ways to manage your warranty requests in CoConstruct
- Filter your warranty list to drill down by sublist and/or assignee, giving you a quick way to view the items assigned to particular team members or subs. Learn more about organizing your warranty requests into sublists.
- The printer-friendly layout of the Warranty page gives you a clean and sleek way to turn your online to-do list into a physical document that you can hand to a sub. Filter by assignee and then use the printer friendly view to create a printout specific to a single person.
- Update multiple warranty requests at once for quick and simple reassignments, completions, and more. Learn more about mass updates to your warranty list.
- Delete a warranty request that may have been entered in error. If there are any attachments or comments that you would lose in the process, you can have those retained for the full log of interactions on the project. Note that you will not be able to delete requests that were entered by the clients. Instead, mark those "Not Warranty" to drop them to the bottom of your Warranty page and remove them from your list of open work.
- Upload files with important warranty info for your clients directly from the Files & Photos page, and your clients will see the files front and center when they visit their Warranty page. Learn more about posting warranty info for a client.