
There are a few different paths to unlocking CoConstruct’s single-entry construction estimating system. Account for important financial details of any project using the estimate. Start by creating an estimate on any Prospect or Active project.
Here are three options for getting your estimate off the ground:
- Build Your Estimate from Scratch
- Start from a Spec/Selection Template
- Let our Team Import Your Existing Estimate
Check out other estimating tools to enhance this process too.
Build Your Estimate from Scratch
Financial data in CoConstruct organizes in three tiers. This structure provides the foundation for inputting descriptive scope details, costs, quantities, selection options, and more.
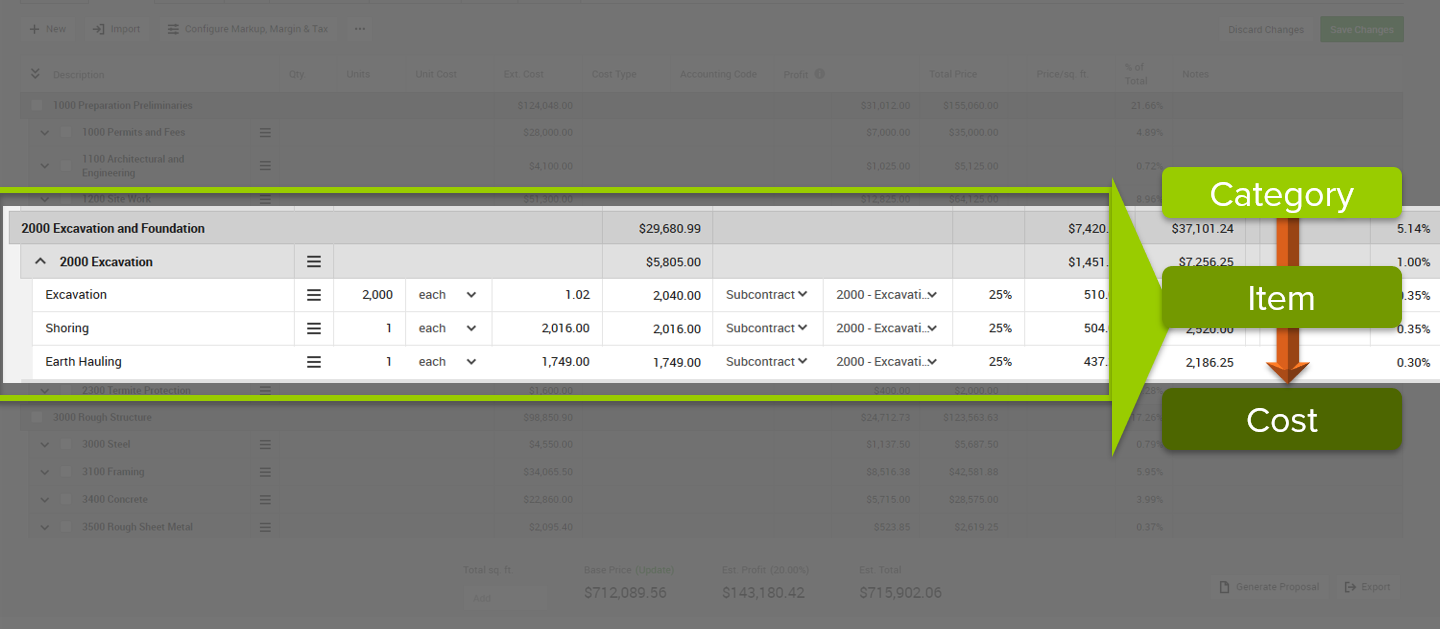
Categories
The highest organizational bucket used to sort and order the estimate. Categories often follow the order of construction, construction phases/divisions, or rooms/areas under construction. Your account comes pre-populated with an Industry Standard template with categories formatted to resemble the National Association of Home Builders (NAHB) structure.
Organize or structure data more in line with CSI divisions? Contact support@coconstruct.com for the full template.
Items
The second tier of financial information that represents the major building blocks of the project. These either contain financial data for Specifications or Selections, and house important scope of work details.
Cost Lines
The smallest, third tier of financial information where individual prices and costs live. Individual cost lines roll up to a total cost for the item as a whole so those individual units represent all the relevant prices needed to represent the total cost of the project. Each cost line receives a quantity, unit type, unit cost, and accounting code.
Add information to the project's estimate by selecting + New. Choose from the list of options to create an ITEM from scratch (by selecting Specification or Selection from the list) OR by bringing items down from a template (see below).
Select which type of item you need to price and define, then fill out the relevant details. See below for a quick breakdown of the parts and pieces to creating an ITEM.
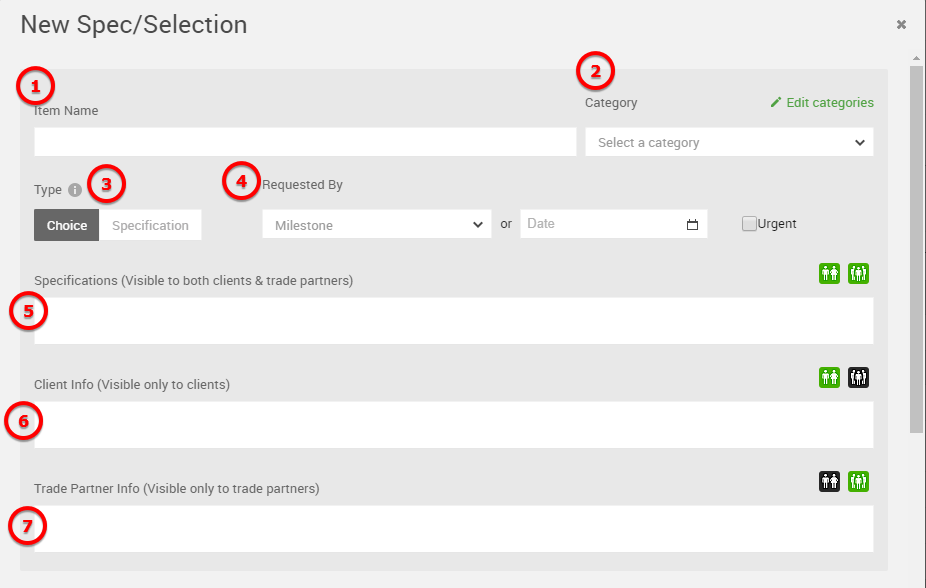
Anatomy Breakdown:
- Item Name = What is the name of the area of work you will define and price? Type out what you call the specification or selection.
Pro Tip: Clearly identify the parts and pieces of the project using this field PLUS put in a numbering system in front to sort/order items how desired. - Category = What larger bucket of the project does this area of work belong to? Select from the drop down list where this item should fall. Choose from the pre-populated list of Industry Standard (NAHB) categories provided or any others already created.
Need a new category or need to edit an existing one? Use the Edit categories option to keep things moving. - Type = What type of item is this? You choose whether an item is a Specification or Selection/Choice style.
Quick Hint: Selections house any decisions or choices clients need to make regarding the project's scope/details. - Requested By = Provide clients with a deadline or due date by when you need their decisions made. Choose on Selection items to tie this due date to a milestone on the schedule OR manually entering a hard date.
- Specifications = Descriptive text visible to everyone with access to the project. Use this text field to offer relevant background, specs, and details regarding this area of the project.
- Client Info = Information clients specifically need for understanding the scope of work or expectations regarding choice making. For example, on a Plumbing Fixture allowance selection, put in the preferred plumbing vendor (company, address, hours of operation, contact person), what you need the client to select (i.e. faucets, sinks, toilets, etc.), and what information about those selections the client should report back (i.e. model number, color, height, manufacturer, etc.).
Pro Tip: Set up common instructions in your Specs/Selections template -- copy and repeat on future projects! - Trade Partner Info = Specific instructions or details designed just for your trade partners. Include installation instructions, notes to vendors, or other trade-only notes here.

Anatomy Breakdown Continued:
- Client Allowance = On fixed price projects, specify that the original budget costs detailed include amounts clients use to "go shopping." Check the box to show clients this number.
Running an Open Book project? Clients see all the budget items! Simply label appropriate costs as allowance items to indicate where they can spend. - + Add Cost Line = Add costs to the original budget of the project. Think of any costs added here as contributing to the original contract price you'll present to the client. Fill out the appropriate description, quantity, unit type, unit cost, cost type, and accounting code for the individual price. The system automatically tacks on any markups/margins to build out a cohesive project total.
- Predefined Choices = Present clients with a set number of options to choose from. List as many options as needed knowing the client will see the corresponding description and price. Lay out various selection scenarios using this type of choice.
- Open-Ended Choice = Are there endless options the client could select from? Are you sending the client shopping? This option type provides clients a text box they simply type into to detail their choice.
Pro Tip: Use the Client Info field to explain how clients interact and fill out this option. Be specific to prevent questions and calls later.
Need to quickly build an estimate with costs?
- Add New items from scratch or a template
- Give the item a Name and assign it to a Category
- Click to Add Item at the very bottom
- Use the tri-bar icon next to the item to Add Cost Line
- Fill out the cost details
Start from a Spec/Selection Template
Leverage a Specs & Selections template to get started. From the + New menu, select Copy from Spec/Selection Template.
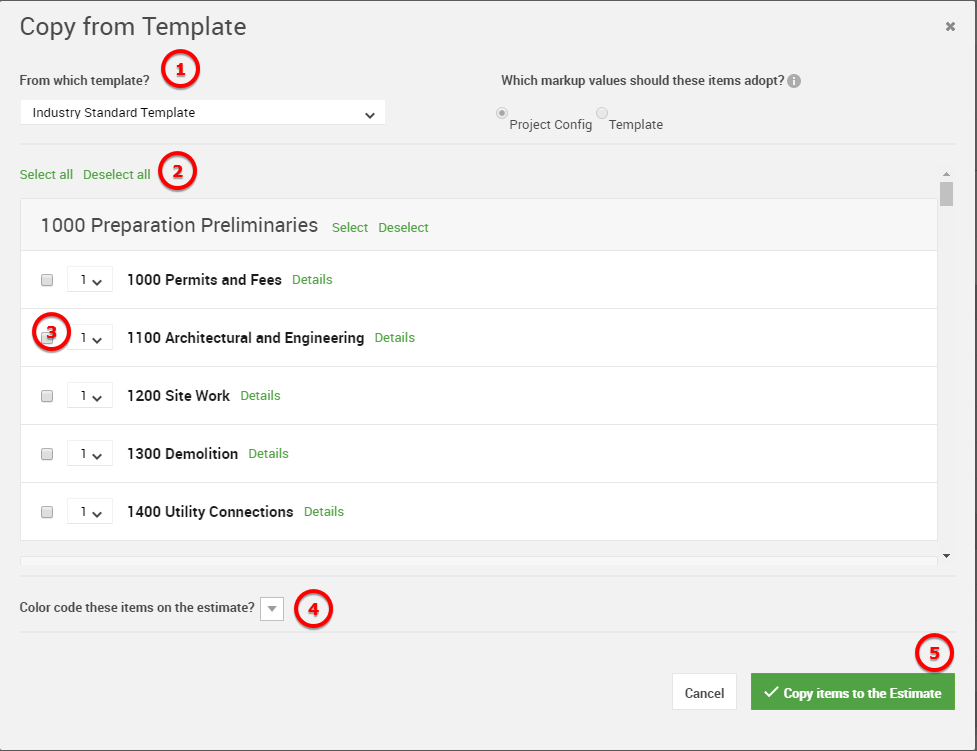
Use the window to select which template to pull from then specify which items from that template are relevant to this project's estimate. See a quick breakdown of the various parts and pieces below.
Anatomy Breakdown:
- From which template? = See your entire template library from this drop down to select which Spec/Selection template to pull from.
NOTE: Pull in items from multiple templates by returning to this screen. All your items will merge and combine to create one cohesive estimate. - Selecting Items = Use the Select all option to choose the entire template OR pick individual pieces by checking the boxes next to needed items. Does an entire category of items belong on this estimate? Each category comes with a Select option allowing for all items within to copy down.
- Number of Items = Copy down multiple versions of an item. For example a new home design calls for 2 fireplaces (one in the living room and one in the master bedroom). Use this function to bring down the Fireplace item twice to save time!
- Color Coding = Attach a color to all cost lines from the template when copied down to the project's estimate. Use this to create visual indicators about the status of a particular cost (i.e. what costs are stable vs still out for bid).
- Copy Items to Estimate = Use this button to finalize your selections and bring them into the project's estimate. Any items selected contribute to the project's estimate and add to any other information already there.
NOTE: Your account comes pre-populated with an Industry Standard Template reflecting the National Association of Home Builders (NAHB) standard flow and organization. Leverage this information and tweak to suit your process.
Can I copy from multiple templates? Absolutely! Simply repeat the whole process to bring in the required items.
Let Our Team Import Your Existing Estimate
Already have fantastic estimates as spreadsheets in other systems? Send those documents to your Customer Success Coach or directly to support@coconstruct.com. We'll do the heavy lifting of getting all that wonderful data into CoConstruct.
Looking to tackle some of the work yourself? Simply transfer your current estimate into CoConstruct using the details explained above.
Other Estimating Tools
Take advantage of other great estimating tools beyond entering costs and scope. Note: Some of these tools are available in certain CoConstruct plans.
- Configure your Markup, Margin, & Tax = Set certain percentages to calculate on top of the raw estimated costs.
- Leverage Parameters = Enter in project measurements and dimensions then tie to specific cost quantities to generate quick cost totals.
- Utilize Formulas = Combine measurements and amounts together to create accurate quantities.
- Pull Prices from the Cost Catalog = Store common vendor and trade prices in one place then pull them into projects as needed.